
Terraform is a fantastic tool for provisioning your infrastructure. Rather than configuring your set up through cloud provider UIs you can code-ify your set up (infrastructure as code, or IaC). There are lots of benefits to this, to name a couple:
- You can version control your infrastructure
- You can delete and re-create your infrastructure with ease. This can yield significant cost savings such as removing your staging and dev infrastructure when no one is using it.
In this tutorial, I’m going to run through setting up a stack for the OpenShot application on AWS which consists of a web API and video rendering. It will still be relevant for any applications you want to set up with Terraform.
You’re probably sold on Terraform already (hence why you’re reading this), so let’s get started.
Terraform’s Key Concepts
This is some common terminology used in Terraform, and what they mean in plain english.
| Providers | Your cloud providers such as AWS, Google Cloud, Azure, Cloudflare. The full list of supported providers is available here: https://www.terraform.io/docs/providers/index.html. To use a provider, we need to declare it in our Terraform file (more on that later). |
| Variables | Variables are declared in a separate file and are usually things such as API keys needed to automate your cloud infrastructure. |
| Resources | Individual configurable items within your cloud provider. For example, the following things are resources: – EC2 instances – Security groups |
| Modules | Groups of infrastructure concepts. For example, I have a lot of sites that share identical Cloudflare setups (DNS, Proxy Caching, etc). I’ve grouped these into a module to avoid duplication and to keep them consistent. |
| Outputs | Useful information that you need, that you don’t know before provisioning. You may want to output things such as IP addresses. |
| Data | Data sources are things that you don’t create in your cloud provider but need to read from. A good example could be automatically searching the AWS marketplace and picking an image for your instance. |
Install Terraform
Terraform is easy to install. Download the correct version for your OS from this page: https://www.terraform.io/downloads.html. Extract the file and move the terraform binary file to somewhere in your path. For Mac and Linux users, this should do it:
$ cp ~/Downloads/terraform /usr/local/bin/Then run the below command to test that it’s installed correctly:
$ terraform -vYou should see your version output into the console; that means we’re ready to create our project.
Install AWS CLI
Make sure you have your AWS CLI installed correctly. It’s outside of the scope of this tutorial, but it should only take 5-10 minutes using the docs here: https://aws.amazon.com/cli/.
Create Your Terraform Project
A Terraform project is just a folder with .tf files inside it. Terraform also creates a .terraform directory and .tfstate files automatically when it detects .tf files. From your terminal, create the folder to contain your Terraform project:
$ mkdir my-terraform-stack && cd my-terraform-stackAdd the AWS Provider
Create a new file to contain your new AWS stack. I’m going to create a new file called openshot.tf because the stack I’m going to provision will be running the OpenShot video API. Inside it, add the following declaration:
provider "aws" {
  region = "eu-west-2"
}
This means we want to install the Terraform AWS provider, and we want to set the default AWS region to eu-west-2. To kick off the install, run the following:
$ terraform initThis will install the AWS provider at the latest version.
Search for an AMI on the AWS Marketplace (optional)
I need the AMI ID for the custom image I want to launch on my instance. If you’re installing a regular AMI such as AWS Linux or Ubuntu you can probably find this online.
I want to replicate the search I would normally do on the AWS Marketplace; I know that searching for “OpenShot” returns the OpenShot image I want to use. I can use a data source to do this. There is an aws_ami data source that is part of the AWS Terraform provider, the documentation is here: https://www.terraform.io/docs/providers/aws/d/ami.html
In my openshot.tf file, I’m going to add the following declaration:
data "aws_ami" "openshot_ami" {
  most_recent = true
  owners = ["aws-marketplace"]

  filter {
    name = "name"
    values = ["*OpenShot*"]
  }
}
This does the following:
- Use the aws_ami data source. Store the result in the openshot_ami variable (we’ll access this later).
- Use the aws-marketplace owner for the data source.
- Add a search filter on the AMI name, with the value “*OpenShot*”. The asterisk acts as a wildcard.
We haven’t created anything in our cloud provider yet, but we can test our data source works with the following output (add this to the same file):
output "openshot_ami_id" {
  value = data.aws_ami.openshot_ami.id
}
This does the following:
- Declared an output named “openshot_ami_id
- Sets the value to a data source, the aws_ami data source, the one we named openshot_ami, and finally the ID property
Run the following command in your terminal:
$ terraform applyYou should see the outputs displayed. I see openshot_ami_id = ami-07a755b21194d725f. This means our data source is working.
Create our EC2 Security Groups
Before we can launch an EC2 instance we need security groups. The docs for the security groups AWS Terraform resource is here: https://www.terraform.io/docs/providers/aws/r/security_group.html. We need to open port 80 for HTTP and port 22 for SSH.
Let’s add the following to our Terraform file:
resource "aws_security_group" "openshot_allow_http_ssh" {
  name = "openshot_allow_http_ssh"
  ingress {
    from_port = 80
    to_port = 80
    protocol = "tcp"
    cidr_blocks = ["0.0.0.0/0"]
  }
  ingress {
    from_port = 22
    to_port = 22
    protocol = "tcp"
    cidr_blocks = ["0.0.0.0/0"]
  }
  egress {
    from_port = 0
    to_port = 0
    protocol = "-1"
    cidr_blocks = ["0.0.0.0/0"]
  }
}
That was a lot, but it’s pretty simple. Here’s what it’s doing:
- Use the aws_security_group resource and call it “openshot_allow_http_ssh”.
- Add an inbound rule (ingress) on port 80 for the TCP protocol. Open this to everyone (0.0.0.0/0). This is our allow HTTP rule.
- Add an inbound rule (ingress) on port 22 for the TCP protocol. Open this to everyone (0.0.0.0/0). This is our allow SSH rule. We could also restrict this to just our IP address for additional security.
- Add an outbound rule for all ports for everyone.
Before we run this, let’s find out about a couple of Terraform commands we are going to use a lot.
Terraform Plan and Apply
The 2 most used Terraform commands are plan and apply. The plan command will show you what changes will be made to your infrastructure based on what is already in your cloud provider and the declarations you have in your Terraform files. Apply will apply these changes to your cloud provider (it will also show you the changes and ask for confirmation). You can run both of these commands from your terminal like so:
$ terraform plan
$ terraform apply
Let’s run a plan to see the new changes that should be made in our cloud provider. You should see the following output:

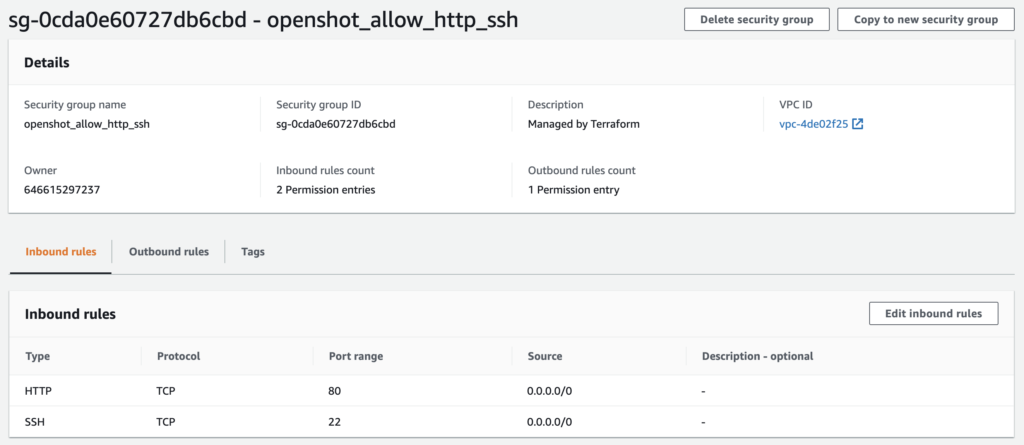
This means the resource we specified will be created as it doesn’t exist in AWS yet. Run the apply command (terraform apply); it will prompt you to confirm the changes by typing “yes”. Log into AWS to see your newly created security group (screenshot below). Note that if you run the Terraform plan again, you should see no changes as your infrastructure is now in sync.
Every time we add or modify parts of our infrastructure we need to run a plan and apply to keep our infrastructure in sync.
Create our IAM User
The OpenShot AMI requires an IAM user in AWS to be created as it asks for an access key and access key secret on installation. We also need to attach 2 roles to the user: AmazonS3FullAccess and AmazonSQSFullAccess as defined in their documentation: http://cloud.openshot.org/doc/getting_started.html. Fortunately, there are Terraform resources for these, so let’s add them to our Terraform file:
resource "aws_iam_user" "openshot" {
  name = "openshot"
}

resource "aws_iam_user_policy_attachment" "openshot_s3_full_access" {
  user = aws_iam_user.openshot.name
  policy_arn = "arn:aws:iam::aws:policy/AmazonS3FullAccess"
}

resource "aws_iam_user_policy_attachment" "openshot_sqs_full_access" {
  user = aws_iam_user.openshot.name
  policy_arn = "arn:aws:iam::aws:policy/AmazonSQSFullAccess"
}

resource "aws_iam_access_key" "openshot" {
  user = aws_iam_user.openshot.name
}
That’s a lot of resources we’re creating! Here’s a breakdown of what we are doing, it’s pretty simple:
- Create an AWS IAM user resource called “openshot”
- Attach the AmazonS3FullAccess IAM policy to our new user
- Attach the AmazonSQSFullAccess IAM policy to our new user
- Create an access key for our new user
We can now run another Terraform apply, and you should see the confirmation message in your terminal. You can also take a look at the AWS console to see your newly created user.
Create our SQS Queue
Next, we need to create our SQS queue; the resource for this is “aws_sqs_queue” (https://www.terraform.io/docs/providers/aws/r/sqs_queue.html). The OpenShot software requires that this is called “OpenShotAPIExportQueue”, so we’ll make sure to include that in our Terraform file. Add the following code to the Terraform file:
resource "aws_sqs_queue" "openshot_sqs_queue" {
  name = "OpenShotAPIExportQueue"
}
By now, this should need no explanation. We create an SQS Queue resource called “openshot_sqs_queue”, with a name of “OpenShotAPIExportQueue”. Go ahead and run another Terraform apply and take a look at the brand new queue in the AWS console.
Create our EC2 Instance
Finally, we will bring all of this together and create our EC2 instance using the resources we created. This is a new resource, the official docs for the aws_instance resource are here: https://www.terraform.io/docs/providers/aws/r/instance.html.
Add the following code to our Terraform file:
resource "aws_instance" "web" {
  ami = data.aws_ami.openshot_ami.id
  instance_type = "c5.xlarge"
  key_name = "openshot-ssh"
  security_groups = [aws_security_group.openshot_allow_http_ssh.name]
  user_data = templatefile("./openshot_user_data.tmpl", {
    access_key_id = aws_iam_access_key.openshot.id,
    access_key_secret = aws_iam_access_key.openshot.secret
  })
}

output "IP" {
  value = "${aws_instance.web.public_ip}"
}
Most of this should be self explanatory by now, but here’s a run down of what it’s doing:
- Create a new aws_instance resource called “web”.
- Make it a c5.xlarge instance (this OpenShot instance is rendering video, hence the instance type. For more information on which instance types to pick see my other post: https://www.mkwd.net/aws-ec2-picking-the-right-instance-types-for-your-web-application/).
- Add the SSH key openshot-ssh. I already have this key in my AWS account in this region and I don’t want to create a new one every time this infrastructure is provisioned. If you don’t have a key here you can quickly create a key pair in AWS > EC2 > Network & Security > Key Pairs.
- Attach the security group. Notice that we are referencing the resource type, its name, and the “name” property.
- Adding some user data. We are going to use the openshot_user_data.tmpl file as a template for a regular bash script, and replace the access_key_id and access_key_secret with the ones we generated earlier for our user. As it’s in the user data of the instance, this will run when the instance is created.
- Add a new output with the public IP address of the instance. We’ll use this later when we SSH onto the instance.
Add the following code into a new file in the same directory as your Terraform files called “openshot_user_data.tmpl”:
#!/bin/bash

printf 'yes
B
my-user
my-password
${access_key_id}
${access_key_secret}
OpenShotAPIExportQueue
eu-west-2

no
' | config-openshot-cloud > /var/log/config-openshot-cloud.log
This script is specific to OpenShot. Unfortunately, we can’t pass parameters into the config-openshot-cloud script so we need to pass strings and new lines to run through the set up for us. Nonetheless, this works and here’s a breakdown of exactly what it’s doing:
- “Yes” to pass the first step of the configuration
- “B” to install both a server and a worker on the same instance
- “my-user” as the OpenShot username
- “my-password” as the OpenShot password
- The access_key_id passed in from Terraform
- The access_key_secret passed in from Terraform
- Connect to the OpenShotAPIExportQueue
- Use region eu-west-2
- Skip the remaining configuration steps (the empty lines)
- Send all of the above configurations as a string to the config-openshot-cloud binary, and redirect the output to a log file
Bringing up the Entire Stack
Now we’ve added all of the resources for our stack, let’s create it. Run a Terraform apply again and accept the changes. The EC2 instance may take some time to boot up and run the user data script. You’ll also see the IP address of the instance that we specified in the output earlier. To test everything is working correctly, I’ll SSH onto the instance using the key we specified earlier using the following command. Note that you’ll need to replace the IP address with the one you see outputted in the terminal from the apply command.
$ ssh -i ~/Downloads/openshot-ssh.pem [email protected]
$ tail -n 100 /var/log/config-openshot-cloud.log
I see the following success message outputted by the OpenShot software to confirm it’s been set up successfully:
Verifying Cloud Connectivity… (can take up to 90 seconds)
http://127.0.0.1/aws/validate/
OpenShot Cloud API Successfully Configured!
Congratulations! Documentation can be found here: http://52.56.238.102/doc/.
If you have any questions, please email us at [email protected].
You’ve now completely set up your Terraform stack in AWS. We can delete our stack at any time by running the destroy command:
$ terraform destroyAfter accepting the changes, Terraform will remove all of the resources that it previously created. It might take a couple of minutes to terminate the EC2 instance.
Got anything to say about this article, or just something cool about Terraform? Leave a comment below!
